Table of Contents
ToggleIf you’ve ever stood in a tool aisle overwhelmed by cordless options, you’re not alone. But here’s what many DIYers miss: corded power tools remain the backbone of serious home improvement work. They deliver consistent power, zero battery anxiety, and often cost less upfront than their cordless cousins. Whether you’re tackling basement framing, refinishing hardwood, or building custom shelving, understanding when and how to use corded tools separates weekend warriors from frustrated homeowners. This guide walks you through why corded power tools still matter, which ones belong in your workshop, and how to set up safely for real results.
Key Takeaways
- Corded power tools deliver consistent power without battery degradation and cost 30–50% less than cordless alternatives, making them the practical choice for serious home improvement projects.
- A foundational workshop of five corded tools—drill, circular saw, reciprocating saw, orbital sander, and angle grinder—handles 95% of interior and exterior projects without overlap.
- Corded tools outperform cordless models for demanding tasks like cutting thick stock, long sanding jobs, and driving hundreds of fasteners into dense hardwoods without thermal throttling.
- Always inspect cords for damage, use GFCI-protected outlets, wear appropriate PPE (safety glasses, hearing protection, dust masks), and unplug tools before changing bits to prevent injuries.
- A hybrid approach—starting with corded tools for foundational projects and adding cordless equipment as your workshop grows—maximizes capability, reduces frustration, and saves money long-term.
- Proper workshop setup with dedicated circuits, cable management, dust collection, and organized tool storage prevents safety hazards and keeps projects running efficiently.
Why Corded Power Tools Still Matter for Home Improvement
Corded power tools have an unfair reputation, people assume they’re old technology. That’s wrong. A corded drill still outperforms many mid-range cordless models when you’re driving hundreds of screws into pressure-treated lumber or boring 1.5-inch holes through dimensional studs. The constant 120-volt supply means no performance degradation as the job wears on.
The real advantage is runtime and cost. You’ll never pause mid-cut because a battery died. Corded tools cost 30–50% less than quality cordless alternatives, freeing up budget for better-quality machines or additional workshop tools. A 10-amp corded circular saw ($80–120) outperforms a comparable cordless model ($300+) on jobsite durability and cutting speed through hardwood. For long projects, sheet goods ripping, outdoor fence building, or framing, corded tools save time and frustration.
They’re also heavier-duty. Corded tools handle continuous use without thermal throttling, and motors tend to have longer lifespan when you’re not cycling charge cycles. If you’re doing serious renovation work rather than occasional touch-ups, corded tools are the practical choice. Weight can be a factor, but a steady hand and proper body mechanics matter more than chasing the lightest tool.
Essential Corded Power Tools Every Homeowner Should Own
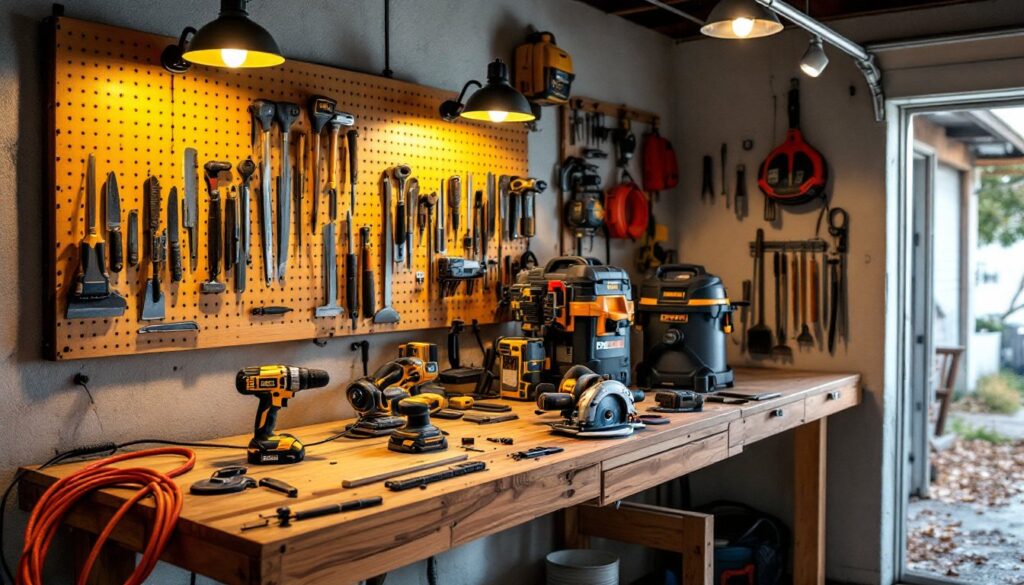
Building a functional workshop doesn’t require twenty tools. Four or five corded essentials handle 95% of interior and exterior projects. The starting five are a drill, circular saw, reciprocating saw, orbital sander, and angle grinder, each solves specific problems without overlap.
Drills, Saws, and Sanders: The Core Kit
A corded drill (0.5–0.75 HP) is your first buy. It drills holes cleanly into concrete, drives fasteners all day without battery fatigue, and costs $50–100. Pair it with a variable-speed corded circular saw (15 amp, 7.25-inch blade) for crosscuts and rips through 2x lumber and plywood. The 15-amp motor delivers consistent RPMs even in dense hardwoods, which cordless models struggle with at depth.
For demo work and notching, a reciprocating saw ($60–120) cuts through nails, pipes, and drywall without stalling. An orbital sander (5-inch random-orbit or 3-inch mouse pad sander, 2–3 amps) flattens paint, smooths rough wood, and prepares surfaces for stain or finish in one-third the hand-sanding time. Many DIYers skip sanders and regret it, prep work is where projects succeed or fail.
Your workshop should include basic hand tools (chisels, pry bars, tape measure, speed square, pencils) and an outlet-strip power distribution system. Consider adding an angle grinder (4.5-inch, 5 amps) if you plan metalwork, cutting pavers, or grinding welds. Most home DIYers can defer this until their second season.
Resources like Must Have Power Tools provide curated lists of tools matched to specific project types. Investing in quality corded tools now means fewer replacements and better results on future work.
Corded vs. Cordless: How to Choose What’s Right for Your Projects
The honest answer: buy both, but use them strategically. Cordless shines for light fastening, cabinet assembly, and jobs where portability without cords wins the day. A cordless impact driver beats a corded drill for driving 200 deck screws, no cord tangling, zero reaching for outlet extensions.
Corded tools excel where power or runtime matter. Cutting thick stock, sanding large surface areas, or driving through dense hardwoods all favor corded. A corded reciprocating saw cuts through 2×6 lumber and masonry without bogging: most cordless models slow dramatically mid-cut. Driving screws into pressure-treated wood for hours? Cordless batteries overheat and throttle performance. A corded drill runs all day flat-out.
Cost is the tiebreaker. If you have $400 to spend, invest in three corded tools (drill, circular saw, sander) rather than two cordless models. You’ll have broader capability and equipment that lasts longer. Cordless batteries degrade after 3–4 years of regular use, so replacement costs add up. Corded motors rarely require replacement if maintained properly.
Start corded for foundational projects, building raised beds, framing walls, refinishing floors. Add cordless as your workshop grows and specific portability needs emerge. The hybrid approach costs less, reduces frustration, and teaches you which jobs suit which tool.
Safety Tips and Best Practices for Using Corded Tools
Corded tools demand respect for electricity and moving parts. Before plugging in, inspect the cord for cuts, kinks, or exposed wire, a frayed cord is a fire and shock hazard. Use a grounded three-prong outlet or GFCI-protected circuit, especially outdoors or in damp areas like bathrooms. Never use a frayed or damaged cord as an excuse to work wet-handed or barefoot.
Wear appropriate personal protective equipment (PPE) every time. Safety glasses protect against dust and debris: hearing protection (earplugs or muffs rated 85+ dB NRR) is essential for circular saws and grinders. A dust mask or respirator (N95 or better) prevents inhalation of sawdust, which contains respirable particles that damage lungs over time. Work gloves prevent splinters but stay clear of rotating bits or blades, glove material can catch and wrap, pulling your hand into danger.
Never remove a blade, bit, or chuck guard while the tool is plugged in. A spinning saw blade can still rotate moments after power stops due to inertia. Unplug before changing bits. Keep cords clear of your work area and away from sharp edges or heat sources. Position your body and stance so you won’t fall into the tool if you trip. On circular saws, let the blade reach full speed before contact: forcing a tool causes kickback and loss of control.
Store corded tools dry and organized. Coil cords loosely (tight wrapping stresses insulation) and hang tools where they’re visible. A 25-foot extension cord rated for outdoor use (if working outside) prevents undersized wire from causing voltage drop or overheating.
Guides like those on Family Handyman cover tool-specific safety protocols in detail, review them before your first use.
Setting Up Your Corded Tool Workshop
A functional workshop doesn’t need a garage or shed. A corded setup works in a spare room, basement corner, or even an apartment balcony with the right outlets and ventilation.
Start with dedicated circuits. Most corded tools draw 10–15 amps: running multiple tools on one 15-amp household circuit will trip breakers. Ideally, install a 20-amp dedicated outlet for stationary work or use a heavy-duty power strip with surge protection and individual on/off switches ($30–60). This lets you manage which tools draw power simultaneously.
Cable management keeps you safe and efficient. Run cords along walls, not across walkways. A cable organizer or cord rack ($15–30) keeps extension cords untangled and ready to grab. Label cords (masking tape and a marker) if you own multiple lengths, knowing which cord is 25 feet saves time.
Ventilation matters more than most DIYers think. Sanding, cutting, and grinding produce dust and fumes that linger. A basic shop vacuum ($100–300) with a HEPA filter captures fine particles better than a household vacuum. Place it near your work area: dust collection reduces cleanup and protects your lungs. If you’re working indoors on finishes or adhesives, crack a window or use a small box fan to exhaust fumes.
Organize your layout by task: a work table or bench (48×24 inches is solid for most home shops) becomes your surface for drilling, driving fasteners, and assembly. Mount a pegboard or tool rail above the bench so tools are visible and within arm’s reach. Wall storage prevents tripping hazards and keeps corded tools from tangling.
Projections and tutorials on Instructables show real-world workshop layouts scaled to small spaces. Most setups don’t require more than a corner of a basement or garage. The goal is organized, safe, and efficient, not magazine-worthy.
Conclusion
Corded power tools remain the reliable, affordable workhorse of home improvement for good reason. They deliver consistent power, run as long as you need, and cost less than premium cordless alternatives. Starting with a drill, circular saw, sander, and reciprocating saw positions you to tackle framing, finishing, demolition, and assembly, the backbone of real renovation work. Pair that foundation with proper safety practices, smart cord management, and organized storage, and you’ve built a workshop that pays dividends for years. Start corded, learn the tools, and add cordless models strategically as your projects evolve. That’s how you build genuine skill and confidence.